I created a "reminder" app called "Memory Bank" on AppGyver a while back and I used local (client-side) storage as the data source for the application. That works alright if you want the app owner to be the only person accessing the app's data. If you want to share data with other people though, you need to use a server-side database like Airtable. I already had an account on Airtable so I decided to try creating a database there and connecting it to Memory Bank.
Here's the process I went through to modify Memory Bank:
- I went into my Airtable account and created a new base (called "Memory Bank") and made several entries:
- I had already built a "Memory Bank" application on AppGyver, so I headed on over to AppGyver and opened that app.
- The first step in connecting my app to Airtable was to click on "Data" at the top of the Composer Pro page in AppGyver and select to create a "REST API direct integration source."
- That took me to this screen:
I named the data resource "Reminders", which left 2 fields to fill in: the URL for my data source (in Airtable) and the authorization code required by the Airtable API. To find those two pieces of information I went to the Airtable API documentation and selected my Memory Bank app. The format of the "Resource URL" is always "https://api.airtable.com/v0/" plus the ID for your Airtable base. Once you select your base and go to the API "Introduction" page, you'll see the ID for your base:
Add that ID onto the end of the standard part of the URL and you've got your resource URL: https://api.airtable.com/v0/appLDk6vjj0I4wUXI/Reminders
- To get the API key I opened my Memory Bank base, clicked on "Account" and selected to generate the API key for Memory Bank. Once I had that key I clicked on "HTTP Header" on the AppGyver screen above, typed in "Authorization" as the key I was creating, "Auth" as the label, and pasted my API key into the "Value" field.
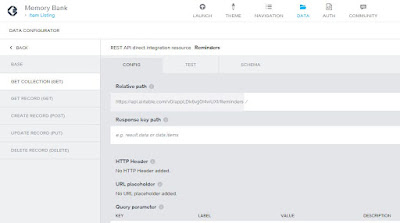
- Next, I clicked on "Get Collection" tab on the left side of the screen, which brought up this page:
The "Relative path" is already filled in for you. AppGyver defines the "Response key path" as the "path to the key containing the relevant data in the response". I wasn't sure what that meant, so I decided to just go ahead, click on the "Test" tab, select "Run test" and see what would happen.
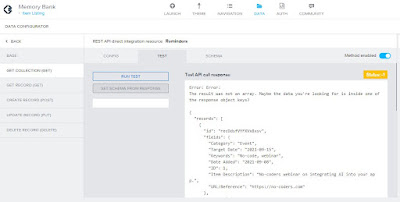
- What happened was an error message: "The result was not an array. Maybe the data you're looking for is inside one of the response object keys?". At first that didn't exactly clear things up for me, but after looking at it for a while it occurred to me that the message was saying that it had received an object rather than an array of data records - and yes, my 3 records from Airtable were there inside the "records" object:
I would like to say that I immediately knew what to do to fix the problem, but the truth is that I fumbled around for a while until I went back to the "Get Collection" config screen and entered "records" in the "Response key path" field. Once I did that and re-ran the test I got just the array of data records from Airtable.
- Next, I clicked the "Set schema from response" button so that AppGyver would use the same configuration to accept data requests from Airtable. Then I opened my Memory Bank app in AppGyver, added a "Reminders" data variable to my record listing page and tied the display elements on the page to the new data variable.
- Finally, I launched Memory Bank on AppGyver and navigated to the listing page, which looked like this:
Of course there's more to connecting external sources to AppGyver, but this should give you the basic idea of how to use an API to exchange data with an external database. Also, if you're interested you can see how I developed the Memory Bank application in AppGyver in my book: "Building a Visual Programming (No Code) Mobile App on Adalo, AppGyver, Glide, GoodBarber, Honeycode and Mendix".


No comments:
Post a Comment