Wednesday, December 22, 2021

Another Bubble.io

 Anyone who has been exposed to world of no-code is probably familiar with bubble.io, one of the most popular no-code development platforms. Yesterday I ran across another Bubble.io though - an award-winning augmented reality app developed for the 2018 Seattle AR/VR Hackathon. The app isn't a "no-code" product but it caught my interest because of the name and because augmented reality is rapidly making its way into the world of no-code.

What exactly is "augmented reality"? It's loosely defined as digital information superimposed on real world objects. If you watch college or NFL football you're familiar with that yellow "first down" line that you see on your TV. Or maybe you've used an app that shows how different pairs of reading glasses would look on your face in real life. Those are both examples of augmented reality and there are more examples popping up every day. 

If you look at most lists of emerging trends in both the private and business sectors, you'll find augmented reality as one of the main areas to keep an eye on. No-code platforms are also adding AR features, one example being Appy Pie's built-in AR/VR App Builder. Other platforms may not have integrated AR into their system yet, but you're starting to see AR plugins and I expect that trend to grow significantly in 2022.

What can you create with augmented reality? The Bubble.io app is a great example of the possible uses for AR applications. People like myself who have suffered significant hearing loss can find it really difficult at times to understand what other people are saying. Bubble.io utilizes augmented reality to provide real time closed captioning for individuals who are hearing impaired. It differentiates between speakers and displays speech "bubbles" showing what each person is saying as they say it. 

You can see an example of the Bubble.io app at work at:   https://eskandari.me/bubble-io


Wednesday, December 8, 2021

New Series on No-Code Coming Soon on Webflow TV

Webflow TV is planning to launch a new series on the growth of no-code, beginning in early 2022. The announcement reads:

No-code web development is changing the game and helping people close the gap between idea and impact. Generation No-Code, goes behind the curtain to tell real stories of how agencies, entrepreneurs, and creatives are becoming more empowered on the web — and using no-code tools to pursue their dreams. See firsthand the impact no-code is having on today’s visionaries and get inspired by their passion and drive. Generation No-Code is directed by Matthew Encina and the first episode will premiere in early 2022 on Webflow TV. (https://webflow.com/tv)

Stay tuned for further information...


Monday, December 6, 2021

A Template for Designers, Writers and Developers

Zeroqode (www.zeroqode.com) has an interesting no-code template that could be useful for anyone who wants to build an app to display their projects, including things like other apps, books, artwork, etc. Here's the description for "Archimist":

Archimist no-code template is designed to help you build an app without code which allows you to showcase your works, add and delete projects, add team members, design articles and more. This fully functional and responsive template is suitable for architectural, interior design, construction practices etc. It will make your work look more impressive and attractive to viewers and potential customers.


Features:
- Filterable & Integrated projects/portfolio
- Newsletters subscription to mailchimp
- Micro Blog/News page
- Well designed dashboard
- Fully responsive pages
- Sharing buttons for blog
- Minimalist Design

Wednesday, November 24, 2021

GPT-3 Now Available to All Developers

OpenAI has just made GPT-3 generally available to all developers (in supported countries). What is GPT-3? Wikipedia defines Generative Pre-trained Transformer 3 as an autoregressive language model that uses a deep learning neural network to produce human-like text. In other words, GPT-3 can automatically write news stories and articles, create blog posts, compose poetry, and more, in addition to generating working program code in more than a dozen programming languages. GPT-3 is also being used to develop conversational models which can respond to comments or questions with replies that fit the context of the conversation.

The potential for GPT-3 continues to grow with new applications showing up almost every day. For instance, one developer has combined Figma's user interface prototyping with GPT-3 to create websites just by describing the desired type of website in a couple of sentences. Another example of GPT-3's flexibility is its ability to convert program code from one language to another using CodeX, GPT-3's code generator. Mark Ryan has even been able to use CodeX to convert old COBOL legacy code into usable JavaScript routines (https://towardsdatascience.com/codex-translates-cobol-into-javascript-266205d606c0). You can find dozens of other examples of what's possible with GPT-3 by going to:https://gpt3demo.com/. 

There are a number of known weaknesses in GPT-3 though: 

  • The model is pre-trained - it doesn't continue to learn from each interaction.
  • If the Internet material that was used to train GPT-3 included biased content, GPT-3 will tend to exhibit those same biases.
  • GPT-3 can only accept a limited amount of input for each interaction, so the input has to adequately describe the desired result.

Plus GPT-3 also has a dark side. According to an article on VentureBeat.com, "the Middlebury Institute of International Studies’ Center on Terrorism, Extremism, and Counterterrorism found that GPT-3 can generate “influential” text that could radicalize people into far-right extremist ideologies. A group at Georgetown University has used GPT-3 to generate misinformation, including stories around a false narrative, articles altered to push a bogus perspective, and tweets riffing on particular points of disinformation."

OpenAI does have guidelines that specify what type of content GPT-3 can and can't be used to create and filters to try to detect models that violate those guidelines. However, like many other advances in technology, it's still an open question as to whether tools like GPT-3 can be supervised effectively and what their overall effect will be. 

So what's the future of GPT-3 and similar deep learning models? The best answer  is that OpenAI and other organizations specializing in neural network applications are already hard at work attempting to develop even more advanced deep learning models. There's no turning back at this point, so hopefully GPT-3 and its successors will avoid the "AI is going to take over" stigma and turn out to produce more benefits than problems.

Wednesday, November 17, 2021

Glide Pages

 Glide (www.glideapps.com) has been one of the top choices for anyone looking to create mobile apps without coding, but they have just added the "missing piece" to their platform. With the introduction of "Glide Pages", you now have the ability to create responsive web apps and websites in addition to native mobile applications. 

You build Glide "pages" by dragging and dropping "Collections" onto the design screen. There are different types of Collections for different types of data - "cards" for images and "grids", "table b" and "lists" for tabular data. You can also attach "actions" to collection objects, items within a collection and other design components. Actions include updating records, showing notifications and calling webhooks (webhooks are a mechanism for applications to communicate with each other). 

Since apps created with Glide Pages are actually web-based, it's easy to provide people with access to your application just by setting up a web "portal" and providing users with the URL for that web page. Setting up a portal also allows you to create a secure environment by requiring user logins, where each user only has access to the data specified for their particular group or role.

You can find more detailed information on Glide Pages at:

"https://docs.glideapps.com/all/courses/introduction-to-pages"  and 

"https://www.youtube.com/watch?v=qhGbbUUFzVk"


Wednesday, November 10, 2021

Data Cleaning with No-Code

What is “data cleaning” and why do it?

Almost every organization has missing, incomplete, duplicated, inaccurate or otherwise unreliable records in their spreadsheets or database. In order to work with that data to produce meaningful information those records have to be repaired or deleted - “cleaned” in other words. Doing that by hand is time-consuming, error-prone and expensive and creating a program to do the work requires coding expertise.  Now however, there are no-code platforms that can help businesses repair their data automatically, without doing any program coding. 

What is “cleaned” data used for?

In recent years more and more organizations are using their accumulated historical data to create data visualizations and to train machine learning models. Errors in the input data due to missing, incomplete or invalid fields will lead to invalid or inaccurate results from machine learning models trained on that data.

How does a no-code data cleaning site work?

Generally you import your raw data, make sure all the columns are showing with the correct type of data in each column, and then you select to start cleaning. At that point you can normally set up cleaning rules or "transformations" for each particular column. A cleaning rule might be "Remove duplicate values" or "Replace any missing values with the word 'Unknown'" or "Remove any rows with a value over $999 in this column". Once the data has been cleaned you can visually spot check it to make corrections manually or to make sure that you didn't leave out any necessary transformations. Then you should be able to export the cleaned data as a CSV file that can be used as input for a "no-code" machine learning platform.

Where can I find a no-code data cleaning platform?

There are a number of platforms that allow you to clean raw data without needing to do any coding. Probably the most complete platform at the moment is Amazon Web Services' Glue DataBrew; you can find a detailed explanation of how it works and what options you have available with it at:

https://aws.amazon.com/blogs/aws/announcing-aws-glue-databrew-a-visual-data-preparation-tool-that-helps-you-clean-and-normalize-data-faster/ 


Wednesday, November 3, 2021

Walmart Joins the No-Code Revolution


Walmart is in the process of acquiring Botmock, a no-code startup that has developed specialized software that allows anyone with a little technical knowledge to build and deploy conversational apps. Botmock's interface creates program code automatically as the user constructs conversational flows.

Walmart's customers rely more and more on being able to shop using voice and text apps, which normally take a lot of trial and error to develop. Cheryl Alnoa, a senior vice president with Walmart presented this example:

“Building seamless interactions for voice or chat is a rather difficult design problem where we have to consider all kinds of conversational flows that depend on the individual situation and customer needs,” said Ainoa. “For example, if a customer uses their voice to create their weekly shopping cart, they could say, ‘Add milk to my shopping cart.’ The correct action and reaction to the customer will depend on several factors, including if the customer has bought milk in the past, what type of milk they prefer (e.g. 2%, non-fat, etc.). Do you already have a type of milk in your shopping cart? If so, should we ask if you want to change the quantity or let you know that you already have it in your cart? “

With Botmock's technology, applications like this one can be put together in days rather than weeks or months. Considering the savings in time and effort that are possible now, Walmart hopes to have the new voice and text app features available to all the companies in the Walmart family in the very near future.

Monday, October 25, 2021

Zoho One - Zoho's "Business Operating System"

I've posted before about Zoho Creator, Zoho's no-code/low-code app development platform. Creator is one of the oldest and easiest platforms to work with, but it's just one of numerous products in the Zoho family, which includes Zoho CRM, Zoho Forms, Zoho Sheets, and Zoho Books among others. Back in 2017 Zoho combined access to these applications in a single product called "Zoho One", which they refer to as a "business operating system". The latest version of Zoho One was released earlier this month and it offers a truly integrated package of applications - and what's really nice is that wirh Zoho Creator you can create custom apps that can exchange data with Zoho One applications.

Zoho One now includes over 50 applications and services, all available in one unified user interface. In addition, there is support for adding third party services by means of API connections. Here are a few of the applications and services in the suite:

  • Sales
    • Zoho CRM - A Customer Relations Management app that can be used by any size business.
    • Zoho Bigin - A CRM for small to medium sized businesses.
    • Zoho Sites - Build no-code websites.
  • Marketing
    • Zoho Forms - Simple mobile form maker.
    • Zoho Survey - Create online surveys and questionnaires.
    • Zoho Commerce - Allows users to build a website/store, take orders, track inventory, process payments, manage shipping, market products or services and analyze collected sales data. 
  • Support
    • Zoho Lens - Provide online support for users with the help of a  smartphone camera and augmented reality software.
  • Productivity
    • Zoho Mail - Provides email services for personal and normal business email.
    • Zoho Projects - Project management software.
    • Zoho Connect - Team collaboration software.
    • Zoho Learn - Knowledge management and learning software.
  • Finance
    • Zoho Books - Online accounting software.
    • Zoho Invoice - Online invoicing software.
    • Zoho Inventory - Online inventory management software.
  • HR
    • Zoho People - Online human resources management software.
  • Business Process
    • Zoho Analytics - Business intelligence and data analysis software.
    • Zoho Data Prep - Data cleaning software.
    • Zoho Creator - Develop custom applications without coding and interface with other Zoho products and third party services.
Interfacing Zoho Creator with other Zoho applications does require some (small amount) of JavaScript or HTML coding, but there are lots of examples online to guide you. Even when you need to modify the coding in the examples the changes or additions are normally self-evident. Overall, Zoho offers an interesting option for customers looking for a comprehensive, integrated business management system that can be customized with no-code apps.

By the way, if you're wondering how popular Zoho and Zoho One are, here are some figures about how many people use Zoho:

"Zoho recently celebrated its 25th anniversary and has grown to over ten thousand employees in the last twenty-five years. Zoho has seventy million users in one hundred and eighty different countries. Zoho One has over forty thousand customers, with the largest customer having thirty-two thousand employees.

You can find out more about Zoho One on YouTube at:

https://www.youtube.com/watch?v=_dgn9rIKLDI 

Thursday, October 21, 2021

Building a Predictive App with Zoho Creator

Zoho Creator is another no-code/low-code app builder that allows you to create machine learning apps. You can find an example of how to make use of Zoho's AI features by going to:

https://zoho.com/creator/newhelp/forms/fields/prediction/add.html

I decided to go through the steps to build a simple machine learning app to estimate the selling price of a home, given certain information about the home. Starting with a blank app design, I added fields for the estimated selling price, the age of the house, its size in square feet, the number of bedrooms, the number of bathrooms and the exterior (brick, wood paneling, or rock). Then I selected a “Prediction” field which started the Prediction Builder. The Builder asks you to select the fields for estimated price and for the different parameters or fields that would affect the price:


Next, you define your training data – whether you want to use all records or just specific records. In my case I went ahead and chose “All Records”:


Choosing “Specific records” will make the AI use only those records that satisfy the criteria for building the predictive model.

Next, the Builder displays your choices and prompts you to add a Prediction field:


To train the machine learning model to estimate a selling price you need to supply the model with data by importing appropriate records or entering records manually. It can take quite some time for the model to assimilate enough data to make predictions about an estimated selling price. In the meantime, you can check on how the prediction field's training is progressing by editing the input form, clicking on the prediction field and scrolling down the field properties to “Model Details”.

In my case, after entering 20 or so records, the description under “Model Details” reads “Model training is in progress”:


Once the model absorbs enough data, its Accuracy rating will be displayed under “Model Details”, along with a “Retrain” button which you can use to retrain the model if necessary.

Zoho Creator offers several other AI fields in addition to the Prediction field:

  • Keyword Extraction field – This type of AI field analyzes the text in a single or multi-line text field and extracts one or more “keywords”, which are stored as a comma-separated list. As an example, you could use keyword extraction to search through customer comments and find particular words such as “happy”, “great”, “unhappy”, “flimsy”, and so on. It could also be used to scan the text in a webpage for references to a subject you're researching, such as “dark matter” or “no-code programming”.

  • Sentiment Analysis field – A sentiment analysis field is used to scan a single or multi-line text field and determine if the tone of that text is positive, negative, or neutral.

  • OCR field – The Optical Character Recognition field allows you to extract the text from an image stored on Zoho Creator. It can recognize JPG, JPEG and PNG image formats and can be used to do things like extract the text from a picture of an invoice or a business card.

  • Object detection field – An object detection field can identify the type of objects in a Zoho Creator image field. The objects detected will be displayed as a comma-separated list (for example: “clock”, “table”, “chairs”). The OCR field is capable of detecting a variety of objects, ranging from cats and dogs to stop signs and traffic lights to laptops and microwaves. You can find a complete list at: https://www.zoho.com/creator/newhelp/forms/fields/object-detection/


Friday, October 15, 2021

Creating an Online No-Code Course

What does it take to create an online course that has something to do with the no-code movement? It takes time, patience, and several other things: 

  • Do some research. Explore the popular online course websites like Udemy,  Skillshare, Thinkific, Simplilearn, and Teachable and look for areas of no-code development that aren't well represented (or represented at all). For example, Kintone is a highly-rated no-code/low-code app development platform, but currently there are no English-language courses on Udemy dealing with Kintone. You may also come up with a twist on the usual tutorial courses. There are a number of courses on Mendix on Udemy, but there's also a course that's simple a set of 3 practice tests to help you pass Mendix's "Rapid Developer" certification test.
  • Find out what subjects are the most popular before you decide on exactly what your course will cover. Of course you'll want to check on the number of people signing up for similar courses on platforms that host online courses, but don't stop there. Look at books on Amazon related to your course content and see how many reviews those books are getting and how high they rank. Do the same thing with no-code blogs and forums, as well as any no-code Facebook groups.
  • Find a niche. Once you have a general idea of what type of course material you want to cover, consider narrowing it down to a more specific area and still attract students. It's somewhat similar to publishing a book on Amazon - if your subject is too general it can get lost in among a lot of other books (or courses in this case) that are covering the same material.
  • Make sure what each platform provides. You're going to want a platform that:
    • Allows users to access your course on the web, by phone or on their tablet.
    • Provides a forum for the people enrolled in your course.
    • Offers polls and surveys to provide feedback on how people rate your course, both the content and the presentation.
    • The ability to have students upload course materials.
    • A built-in mechanism to handle payments and refunds.
  • Build the course. Don't be concerned about making the perfect version of your course right way, follow the same procedure that you would when creating a no-code app and start out with a Minimum Viable Product. You can add all the extras once you get some feedback on what your students like and don't like about the course. Here are some additional tips to keep in mind:
    • Micro-learning is a popular concept now for a reason. People tend to learn more easily when information is dished out in small bites. Do the same thing with each lesson in your course - keep the lessons short and focused on one specific topic.
    • To some extent use the method of "say it, then say it again" (or "show it", then "say it again") to try to emphasize main points in your presentation.
    • The majority of people who sign up for an online course never complete the course. Try to gamify things in some way to keep students engaged, maybe offer some special tips or advice for those who reach certain points in the course or points that can be used to purchase additional material.
    • Make sure you have a discussion group for students who have questions or feedback or just want to talk about things that sparked their interest.
  • Don't let inexperience stop you. If you're not sure how to put together an online course there is (somewhat ironically) a course on Udemy on creating online courses, plus there are a number of websites like Snapcourse that can help you build your presentation (or build it for you for a fee).

Monday, October 11, 2021

Guest Post: Reasons for Becoming a Freelance Coder and How to Succeed in This Competitive Field


Normally we focus on "no code", but it doesn't hurt (and in fact it can help) to have a background as a "coder". Today's post is a guest article from Chelsea Lamb, co-founder and head tech writer at Business PopShe provides some valuable advice for anyone interested in becoming a freelance software programmer.

Observers of employment trends have noticed an enormous surge in freelancers. Today, freelancers account for approximately 35% of the world's workforce. At the same time, businesses and customers are becoming increasingly connected with technology. Now is the perfect time to establish yourself as an independent programmer. Mastering No-Code shares some essential information about making the leap into coding for a living.

Why Businesses Need Coders

These days, every company needs programmers to thrive. For instance, having a presence on the web is vital no matter what you're selling. Website building services are okay for personal sites, but they can look amateurish. They also limit you in terms of design choices and the implementation of cutting-edge features.

Further, companies are constantly going paperless and doing more virtually. Therefore, having a debugging expert on speed dial has become particularly valuable. If you have the skills to go further, you might be the person that gets hired to implement companywide upgrades.

How to Become a Coder

The first step toward becoming a successful coderpreneur is learning multiple programming languages. Seek out coding schools where you can learn the ones that are the most in-demand. If you lack experience coding professionally, start by contributing to open source projects. Stay current with everything new in coding; read newsletters, join coder forums, and subscribe to the biggest tech-oriented publications.

How to Market Yourself as a Coder

As with any other business, you need to sell your services. Start with creating an online presence that breaks down your skills and shines a spotlight on your achievements. Don't forget to include a prominent, easy way for browsers to email you. Remember that your site needs to appeal to a wide array of customers, so stay away from jargon. Explain every industry term you do use so a general audience can understand your message.

Advertise your abilities on social media by creating highly shareable posts. Keep in mind that video content has become increasingly popular. Purchasing banner ads is another excellent idea. Never forget about the importance of search engine optimization. 

Follow up with every satisfied customer and request referrals. This technique offers one of the most effective ways of maintaining a steady coding business. Lay off high-pressure techniques and incentivize customers to send people your way by extending a future discount. Remind clients of your availability by leaving business cards or hanging flyers on corporate bulletin boards. Drop off extras for people to distribute with friends and family who might need your high-tech services.

How To Work With Clients as a Coder

Finding success as a coder is about more than excelling as a programmer. You also have to charge the right fee. Decide on your rates before meeting with potential clients. Compare yourself with other coders around the world to figure out how much you should be billing.

How you engage with customers has a massive impact. Take the time to improve your communication skills. Avoid talking in ways that non-coders can't understand. Learning to anticipate client needs is also incredibly important. This skill alone vastly increases how much people want to hire you.

Becoming a freelance coder can be personally satisfying as well as lucrative. Gaining a foothold in this field, however, requires the right approach. Map out a plan that preemptively squashes any bugs you're likely to encounter.

Friday, October 8, 2021

Appian is Adding an Important New Feature

Appian acquired process mining start-up Lana Labs recently, in order to add an important new component to their low-code platform. "Process mining" looks at the work people are doing in an organization and tries to find repeatable processes in that work, processes that can be automated to improve efficiency and accuracy. By adding Lana Labs to their system, Appian offers the ability to determine processes that can be automated and provide the low-code tools to create those automations. 

For anyone looking to provide business automation services Appian is now one possible platform that you can use to identify and build those processes in an integrated environment. The pandemic spurred the move to "digital transformation" of business workflows and systems like Appian's offer an inexpensive and efficient way to help businesses join that movement.

Monday, October 4, 2021

The Ultimate No-Code Platform

Recently I wrote a post about OpenAI's "Codex", which translates natural English language into ready-to-use program code in any number of different programming languages. Codex is currently in beta release and is still in its infant stages, but eventually OpenAI hopes that it can be used to interact with existing program code simply by issuing spoken instructions. That would open up a lot of possibilities - including one that caught my attention over the weekend.

There are still millions of lines of COBOL code out there in the business world, running thousands of major software systems. Converting all those programs to a more modern platform would be a huge task. However, I came across a video this past Saturday about using Codex to automatically translate between Python and COBOL ("Codex translates COBOL to Python", by Mark Ryan, Oct. 3, 2021, https://www.youtube.com/watch?v=uTIk2fifO50). As somebody who has done considerable programming in COBOL over the years, I was really interested in whether Codex could manage to actually translate COBOL code into Python program code (and vice versa).

To test the ability to convert back and forth between the two languages, Mark went to the Codex "playground", entered a very basic "hello world" program in Python and had Codex generate the equivalent code in COBOL. Running Codex's generated code in OpenCOBOL's IDE showed that Codex can indeed handle very simple COBOL programs. However, Codex failed to convert a slightly more complex Python program into valid COBOL code - but it did manage to successfully convert the COBOL version of that program into a valid Python program.

That's a really intriguing result, considering the level of interest in translating a lot of COBOL legacy code into Python or some other language that's in common use today. It's probably still a way off into the future, but Codex could eventually turn out to be the answer to modernizing a lot of those COBOL programs that are still running some of our most important business systems.


Friday, October 1, 2021

Making Money with No-Code

 For most of us the question comes up at some point: how can I make some money working with no-code? The answer is there are quite a few ways to monetize your interest in no-code - some with more earnings potential than others, but they can all bring in some extra dollars. Here's a short list of possibilities:

  • Create a business-oriented web app and market it to local businesses.
  • Create a mobile app focused on social networking and market it to local organizations.
  • Create a website for a local business.
  • Create an online course on websites like Udemy, Udacity, or Skillshare.
  • Offer your services as a tutor for others trying to learn how to use a no-code platform.
  • Create a YouTube channel to discuss all things no-code.
  • Start a blog about no-code.
  • Offer to provide guest posts about no-code programming on other people's blogs.
  • Write an e-book about visual programming and no-code platforms.
  • Volunteer to help a non-profit develop a no-code app or website to build your portfolio and attract paid jobs.
  • Provide assistance to other developers on how to make an app that they can market successfully (including App Store Optimization tips for mobile apps).
  • Create an account on Fiverr and market your services, explaining how you as a no-code specialist can create an app much faster and cheaper than a traditional programmer.
  • Offer to help local businesses automate their business processes to cut down on duplication of effort and reduce errors.


Monday, September 27, 2021

Have an Idea for an App but Want to Make Sure it Looks "Professional"?


Maybe you have a great idea for a no-code app but you're not sure you can make it look "professional" enough. One answer is to try starting from an app template. Most no-code platforms offer at least some customizable templates that provide well-designed page layouts and a slick-looking user interface. Bubble for example has dozens of templates available and you can additional samples on Zero Quode (www.zeroquode.com).

Keep in mind, you don't have to find an exact match with the application you're planning. One of my favorite examples is Caspio's "patient portal" template (https://www.caspio.com/apps/patient-portal/).  It's designed as a communications center for doctors and their patients and includes:

  • A new patient registration form
  • Patient and medical personnel login pages
  • A patient profile page
  • A patient information page (showing the patient's prior visits along with any doctor's notes and recommendations)
  • Message center for exchanging messages between doctors and patients
  • A doctor's dashboard showing data such as visits and messages by patient and a chart of patients by medical status
  • A patient list page where each doctor can see view details on the status of each of their patients
That same design can be used for other applications though. For instance if you wanted to build an app for a fitness center that offers guided fitness plans for members. You could use the same basic layout except that:

  • The new patient form becomes a new member form
  • The login pages are for members and fitness center staff members
  • The message center allows a member to exchange messages with the personal trainer assigned to them
  • The patient (or "member") information page shows each visit to the center by that member and what they did on that visit (what exercises, number of reps, dietary notes, etc.)
  • And the doctor's pages become the pages for the center's personal trainers or "fitness counselors".
You can use a similar approach to almost any app, you just need to find a template that covers the same basic functions as the application you want to build. Some of the templates available for no-code projects are free, others may cost a few dollars or a few hundred dollars. In the long run even an expensive template may be worth the investment if it saves you considerable time and effort and provides the professional look you want for your application. Check out a few of the ready-made templates available online and see if one of them can work for your project.

Tuesday, September 21, 2021

A Quick List of No-Code Pros and Cons

OK, you're debating about whether or not to develop a new app using a "no-code" platform - is it a viable option or not? Well, here are a few "pros and cons" to consider:

  • Pro - In almost every case no-code platforms offer a much less expensive way to create a usable application than paying a software firm to build the app. The initial cost involved in hiring traditional programmers can be dozens of times more expensive than with no-code or "visual programming" and there's a tendency in any software project for costs to creeping upward as changes and additions become necessary.
  • Pro - If you have someone in your organization build the app (or if you have an independent developer build it and teach one of your people how to do it) you retain complete control over the application. If changes need to be made you can do it yourself.
  • Pro - Since a modification to the application is usually as simple as plugging in a different "block" of code, feedback from end users can be almost immediate, reducing the time it takes to complete the app (although the time spent in planning and designing the app is probably about the same whether you're using no-code or traditional programming).
  • Con - The app is tied to the platform it was built on. No-code programs aren't transferrable from one platform to another (although the documentation covering the app's design and logic are transferrable). 
  • Pro - Apps can be created and tested much faster with no-code because you're simply connecting pre-built "blocks" of code rather than coding the program from scratch. 
  • Pro - You're not alone in trying to put your project together. Many no-code platforms have a large and enthusiastic community of users who can provide assistance if needed.
  • Con - Since apps are tied to the platform on which they're created, that means (in almost every case) that you're going to have to pay a monthly or annual fee to continue to run your app on that platform. However, there's a considerable range in how much you're going to have to pay - the fee may be $30 a month or $3,000 a month.
  • Pro - Most no-code platforms offer "plug-ins" and API connectors that let you extend the capabilities of the platform by "plugging in" chunks of custom code or connecting to outside services like Stripe or Google Maps. 
  • Pro/Con - Security can be a cause for concern with no-code apps (the same as it is with traditional programming). The fact that the actual program code is hidden makes it difficult to judge how secure the code really is (although there are some software products you can use to scan even a no-code app for vulnerabilities. Plus, creating app on a no-code platform is definitely more secure than having employees creating scripts and macros in an Excel spreadsheet to work with that same data.
OK, there are a few things to consider for anyone contemplating using a no-code app development platform. One last thing to consider though - the number of individuals and organizations using no-code has grown enormously in the last few years and is continuing to grow every day.

Saturday, September 18, 2021

An Additional Note on Data Visualization

 I came across a really good blog post on data visualization that I wanted to share with you. It's on the Data Pine blog at: https://www.datapine.com/blog/how-to-choose-the-right-data-visualization-types/. The title is "Designing Charts and Graphs: How to Choose the Right Data Visualization Types", by Sandra Durcevic, posted on May 2nd, 2019. 


Friday, September 17, 2021

Data Visualization with Bubble


One of the common "buzz" terms in the digital world these days is "data visualization". What exactly does that mean? The standard definition is "the graphical representation of data and information". Basically, data visualization is an extension of the old saying "a picture is worth a thousand words". We tend to be visual learners and to see trends and patterns much more easily when the data is presented visually in charts and graphs.

So how do you, as a no-code developer, handle data visualization on your favorite platform? Bubble's chart and graph elements offer a good example of how to present data visually in a no-code app. There are all kinds of charts and graphs that can be used to display data including: bar charts, area charts, stacked bar graphs, line graphs, scatter diagrams, pie charts, and Gantt charts and Bubble has "plug-ins" to let you make use of almost all of these. 

As an example of how to use Bubble's "Chart Element" plug-in, here's an excerpt from one of my books that involved a "To-Do" app where tasks could be assigned to different users:

  • One of the changes we want to make to the To-Do app is to add a new page with both a list view of the current tasks and a chart view. To get started, click on the Plugins” tab, search for Bubble's “Chart Element” plugin and install it, then add a new page and name it "chart-view".

  • Drag a repeating group onto the page and position it on the left half of the page, then add a chart element and position it on the right half of the page.

  • Double-click the repeating group to open its property editor and set it to 4 rows of data. Then Build the expression “Search for Todos:grouped by”  in the “Data source” field. 

  • At this point a “Group By” box will display. Click “+ Add a new grouping”, set “Field 1 to group by” to “Assigned To” and click on “+ Add a new aggregation”. Set the “Aggregation 1” function to “Sum” and set the “Field to calculate on” to “Assigned To”. Now the property inspector for the repeating group should look like this:


  • Next, double-click the chart element to display its property editor and set its “Chart type” to “Bar”. The rest of the setup for the chart element is almost the same as for the repeating group. The property editor for the chart element looks like this:


  • Note: The “Group By” function is an important one when you're building different views of the data in the database. As stated in the Bubble documentation, this function “Groups the list into chunks of related entries, and computes summaries of each group.”. In this case, we grouped the Todo's by user and calculated the sum of the hours to-date for each user.
Once these two elements are set up, the chart-view page looks like this in preview:


The listing on the left and the chart view on the right both tell you how the tasks are divided among the three users, but the chart view is definitely quicker and easier to absorb at a glance. That's the advantage of "data visualization" in your app - and this example shows how easily you can include this type of view in your application.

Tuesday, September 14, 2021

Connecting Airtable to AppGyver

I created a "reminder" app called "Memory Bank" on AppGyver a while back and I used local (client-side) storage as the data source for the application. That works alright if you want the app owner to be the only person accessing the app's data. If you want to share data with other people though, you need to use a server-side database like Airtable. I already had an account on Airtable so I decided to try creating a database there and connecting it to Memory Bank.

Here's the process I went through to modify Memory Bank:

  • I went into my Airtable account and created a new base (called "Memory Bank") and made several entries:


  • I had already built a "Memory Bank" application on AppGyver, so I headed on over to AppGyver and opened that app.  
  • The first step in connecting my app to Airtable was to click on "Data" at the top of the Composer Pro page in AppGyver and select to create a "REST API direct integration source." 
  • That took me to this screen:


I named the data resource "Reminders", which left 2 fields to fill in: the URL for my data source (in Airtable) and the authorization code required by the Airtable API. To find those two pieces of information I went to the Airtable API documentation and selected my Memory Bank app. The format of the "Resource URL" is always "https://api.airtable.com/v0/" plus the ID for your Airtable base. Once you select your base and go to the API "Introduction" page, you'll see the ID for your base:


Add that ID onto the end of the standard part of the URL and you've got your resource URL: https://api.airtable.com/v0/appLDk6vjj0I4wUXI/Reminders

  • To get the API key I opened my Memory Bank base, clicked on "Account" and selected to generate the API key for Memory Bank. Once I had that key I clicked on "HTTP Header" on the AppGyver screen above, typed in "Authorization" as the key I was creating, "Auth" as the label, and pasted my API key into the "Value" field.
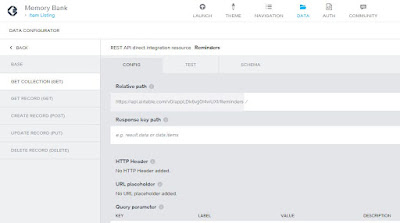
  • Next, I clicked on "Get Collection" tab on the left side of the screen, which brought up this page:


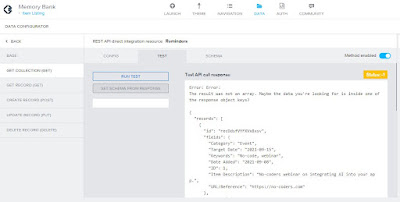
 The "Relative path" is already filled in for you. AppGyver defines the "Response key path" as the "path to the key containing the relevant data in the response". I wasn't sure what that meant, so I decided to just go ahead, click on the "Test" tab, select "Run test" and see what would happen. 

  • What happened was an error message: "The result was not an array. Maybe the data you're looking for is inside one of the response object keys?". At first that didn't exactly clear things up for me, but after looking at it for a while it occurred to me that the message was saying that it had received an object rather than an array of data records - and yes, my 3 records from Airtable were there inside the "records" object:


I would like to say that I immediately knew what to do to fix the problem, but the truth is that I fumbled around for a while until I went back to the "Get Collection" config screen and entered "records" in the "Response key path" field. Once I did that and re-ran the test I got just the array of data records from Airtable. 

  •  Next, I clicked the "Set schema from response" button so that AppGyver would use the same configuration to accept data requests from Airtable. Then I opened my Memory Bank app in AppGyver,  added a "Reminders" data variable to my record listing page and tied the display elements on the page to the new data variable. 
  • Finally, I launched Memory Bank on AppGyver and navigated to the listing page, which looked like this:


And there were my 3 entries from Airtable...

Of course there's more to connecting external sources to AppGyver, but this should give you the basic idea of how to use an API to exchange data with an external database. Also, if you're interested you can see how I developed the Memory Bank application in AppGyver in my book: "Building a Visual Programming (No Code) Mobile App on Adalo, AppGyver, Glide, GoodBarber, Honeycode and Mendix".

Tuesday, September 7, 2021

What Kind of Apps do People Build with No-Code?

If you've ever wondered what types of apps other people build using no-code platforms, here's a list of some of the templates you can find on no-code sites:

  • How to design a mobile app - a template demonstrating how to create a simple but sophisticated mobile app with Bubble. It includes a loading page, a landing page, sign up and sign in pages, and a 5 page app design with headers and footers.
  • A travel app that booking websites could offer their customers. The app allows users to search for hotel accommodations, vehicle, bike or boat rentals, guided tours, and interesting places to visit. In addition built-in APIs let you book airline tickets and other reservations online.
  • An app template for dog sport enthusiasts - people who participate in canine agility, lure coursing, dock jumping, flyball and others. Users can view stories and photos from other handlers, upload their own stories, keep track of upcoming events, and even make travel plans right on the app.
  • A template that provides brand names of food products that are good choices for people with heart problems. In addition the app can contain tips on exercise and stress-relieving activities, local aid and support groups, and the latest news affecting those with cardiovascular concerns.
  • Comprehensive help with starting your own business. An app that is constantly updated with the latest information by state on how to register a new business, federal, state and local tax regulations, tips on hiring employees, marketing products and services, accounting requirements, and names, addresses and phone numbers of state and local agencies that a new business owner may need to know.
  • A "dating" app, but for people who are simply looking for a friend - someone local who shares their interests and would like to go places together. There are people, especially senior citizens, whose family and friends are no longer around and who would like to get out more, but don't want to go alone.
  • Language learning buddies - an app that lets you connect with others who are interested in learning a new language so that you can practice talking and/or texting to each other in that language.
  • Neighborhood job board - post jobs, offers of services, recommendations, even offers to barter services for services. Help keep more business close to home.
  • An analytics app, with each version designed for a specific client to highlight the most important data affecting their operation.
There are still lots of other possibilities for mobile apps that can find a market out there in the world. Hopefully one or two of these ideas can help you find a niche and get started building an app of your own.

Tuesday, August 31, 2021

No-Code Training Boot Camps

There are plenty of no-code training videos out there, but what if you learn best in a guided study environment? Many people focus better in a class setting, so where can you find a no-code programming camp? 

Here are a couple of options:

  • The Canvas No-Code Programming Bootcamp - This free bootcamp uses Bubble's no-code platform to teach students how to create even complex web apps. It's taught by Airdev, a major development firm, and allows you to proceed at your own pace, working through a series of videos and challenges that show you how to build a full web application in just a few weeks. You can also get help from the community if you get stuck.
The camp curriculum covers both Bubble and Canvas, a framework designed to work with Bubble (one of the most advanced visual programming platforms on the Internet). There are four sections to the course: Introduction to Bubble (2 hours), Bubble Basics (12 hours), Introduction to Canvas (22 hours), and API & Canvas (18 hours). You can find more information at: https://canvas.airdev.co/bootcamp

  • MVP Bootcamp by No Code MBA - An online bootcamp designed to teach you how to build, launch and make money with your no-code apps. The camp includes 6 weeks of training on building an app, along with advice on creating an effective business model. Time commitment is 2 hours per week of online instruction, and a recommended total of 4 hours of offline work per week. 

Also included are weekly meetings to discuss the progress of your project and to review videos and articles pertaining to monetizing your app. In addition you get lifetime access to the bootcamp community forum, along with personal assistance from your instructor and peers in your cohort.

Pricing is quoted as being $1990 although the first cohort to go through the bootcamp will only pay $750 (no information on whether or not a group has already been assembled for the first camp). For more details go to: 

https://www.nocode.mba/bootcamp-mvp#faqs

  •  MillionLabs.co.uk - MLabs offers an 8-week no-code camp focused on business applications and learning how to use Bubble (www.bubble.io). The course covers esponsive UI design, workflows, data architecture, advanced bubbling skills and integrating external services through plugins and APIs. Pricing for the bootcamp is listed as starting from $600. Get more information at: https://millionlabs.co.uk/bootcamp.
  • Bubble.io - Bubble offers their own bootcamps, providing 3 different types: A course in fundamentals (4 sessions in 4 weeks), a bootcamp on building and launching your own product idea (8 sessions in 8 weeks), and an advanced course for professionals (8 sessions in 8 weeks). Prices generally range from $600 to $800. Go to https://bubble.io/bootcamps for more information.

Tuesday, August 24, 2021

Nintendo's Visual Programming Game Building App

Nintendo just released "Game Builder Garage", a new app for anyone who wants to learn the basics of video game building. Game Builder Garage uses a visual programming language that lets you connect characters called “Nodon” that have different properties. By combining guided lessons with a variety of Nodon characters and objects Nintendo hopes to make game building as much fun as playing a video game.

The app has two different modes: Lesson mode and Free Programming mode. Lesson mode consists of interactive lessons that include puzzles and tasks for the user to solve. It's designed to introduce the beginner to the mechanics involved in video game design and to reinforce that material by means of the tasks that have to be completed. 

Free Programming mode allows users to design and create their own games. In this mode you can switch between programming and game playing just by pressing a button, so you can test your design and make changes quickly and easily. In addition, you can upload your game to a "game hub" where other learners can download it and you can download their games, play them and study how they were constructed.

Game Builder Garage is designed for the Nintendo Switch and is available in the Nintendo eShop for $29.99. To see a video of Game Builder Garage in action go to: https://www.nintendo.com/games/detail/game-builder-garage-switch/ 

Monday, August 16, 2021

OpenAI's Codex (Update)


OpenAi's new product Codex translates natural English language into ready-to-use program code, in any one of a number of different programming languages. Codex is currently in beta testing, but will eventually be available to everyone through an API. For a detailed look at how Codex works, go to:

https://www.youtube.com/watch?v=SGUCcjHTmGY

This video, put together by OpenAI's founders, covers the development of Codex and several examples of how it can be used in practice.

Thursday, August 12, 2021

Airtable Acquires Bayes.com

The hottest trends in no-code right now are workflow automation, machine learning, and data visualization. Airtable just made a move to bolster its ability to provide data analysis visualization options for Airtable users by buying Bayes.com. 

Bayes' system proactively recommends ways to look at and analyze your data as soon as you upload your data file. Many of those data visualization methods are reminiscent of what users try to do with Excel - which should fit right in with Airtable's spreadsheet format. 

With Bayes you also have the ability to easily export your charts and graphs to emails, Power Point presentations or other media. And you can also use your data visualizations in an interactive mode, allowing others to view and comment on each example.

It's probably going to take a little while for Airtable to get the new forms of data analysis integrated into their platform, but it should add an important feature to their system.

Wednesday, August 11, 2021

OpenAI Codex - A New Brand of No-Code

A few days ago OpenAI (www.openai.com) announced the release of a new version of OpenAI Codex, their Al system that translates natural language statements into program code. Now you can use English to describe what you want your software project to do, and OpenAl’s Al model will automatically generate the corresponding computer code, in whatever programming language you choose. 

OpenAI Codex is a "descendent" of GPT-3 (a neural network machine learning model) and is capable of producing code in Python, JavaScript, Go, Perl, PHP, Ruby, Swift and TypeScript. Codex is basically a version of GPT-3, but one that has been trained on program code instead of ordinary text material. That allows Codex to do things like complete lines of code or entire routines, but originally it wasn't truly a tool the non-coders could easily use.

That’s changed with the new API version, which interprets everyday requests like “make the ball bounce off the sides of the screen” or “download this data using the public API and sort it by date,” and creates working program code in any one of a dozen languages. Also, in addition to being "fluent" in a variety of coding languages, the fact that Codex is trained on pretty much all the public code on GitHub (and other repositories), means it’s aware of standard practices in coding. 

Because of its ability to handle Natural Language processing, Codex can be used to interact with other software, to perform functions within that software that aren't built into the application. OpenAI also says that Codex can convert or "translate" code from one programming language to another, providing code portability. 

Right now Codex is only available to a select group of beta testers. Once, its made available to a wider segment of the public I'll attempt to get a copy and work out an actual example or two. Until then, Codex may be a product to keep a close eye on. 

Friday, August 6, 2021

No-Code Data Science (Part 2)

In Part 1 of this post we covered no-code machine learning platforms in general. In this post I want to go through a few actual examples of how these types of platforms actually work. One thing that needs to be done regardless of the platform involved is to go through the input data (if it hasn't already been prepared for analysis) and get it in the proper format.

If you're supplying your own data the first step in building a machine learning model is to "clean" the input data that will be used to train the model. For example, let's say you have a voter file and want to make some predictions about voting patterns based on how long ago each person registered to vote. Some of the registration dates may be missing or incomplete (such as 9/22/0), some may be entered with dashes (5-14-1987) and others with slashes (5/14/1987), and some may obviously be incorrect (11-03-1847). The missing and incorrect entries need to be removed from the input data and the incomplete records may be removed or an attempt may be made to add the missing portion of the date. Once that's done, all the records need to formatted in the same way for  consistency. Data that's in some form other than numbers (such as images, sound clips, etc.) may require a different approach, but it will still require preparation of some type in order to use it to train a machine learning model.

At this point you're ready to choose a platform and begin building your ML model. These days there are quite a few no-code platforms to choose from - here are several examples:

  • Teachable Machine (https://teachablemachine.withgoogle.com/) - Google's Teachable Machine is a good place to start to get a feeling for how no-code AI platforms work. You can train models yourself to recognize certain images, sounds or poses (like whether you're sitting down or standing up), and host those models for free directly on the Teachable Machine website or in your own website or app. The models are built using TensorFlow.js, a JavaScript library for machine learning and are trained using a method called “transfer learning”. In transfer learning a fully trained neural network model is used, but the original training data is replace with your input. 

To see Teachable Machine in action search for: “Teachable Machine Tutorial: Bananameter” by Barron Webster (November 7, 2019). The tutorial shows  how he used Teachable Machine to identify images of bananas that aren't ripe yet, bananas that are ripe, and bananas that are past their prime. And for a more in-depth look at how Teachable Machine works, take a look at: “How to build a Teachable Machine with TensorFlow.js”, Nikhil Thorat – deeplearnjs.org.

  •  MonkeyLearn - MonkeyLearn is a no-code machine learning platform that specializes in text classification and extraction models which you can use to analyze your raw data in Microsoft Excel. To learn exactly how this works, there's a step-by-step explanation of the process involved at: https://monkeylearn.com/blog/machine-learning-in-excel/.
Scroll down the web page to the heading “How to use Machine Learning in Excel?” and follow the sequence of steps involved. The pre-trained model used is designed to do “sentiment analysis”. It analyzes customer comments uploaded from an Excel spreadsheet, predicts the main sentiment in each set of comments, and returns an Excel spreadsheet with a new column containing the model's predictions. There's also a section in the article covering how to create, train and use a “classification” model, as well as a link to a comprehensive guide to creating compelling data visualizations in Excel.

  • Peltarion - Peltarion has a detailed tutorial to help explain howdeep learning” models are built (https://peltarion.com/blog/applied-ai/defect-detection). The model is designed to detect surface defects in manufactured parts. Properly trained deep learning models are faster, more accurate and more consistent than manual inspections or software using traditional programming. Note: Deep learning is a subset of machine learning and deep learning models are normally trained with artificial neural network algorithms (algorithms that attempt to simulate the reasoning process of the human brain).

This particular model scans images of metal pump impellers and classifies them as either defective or not defective, which makes this a binary image classification problem. The details of how a deep learning model works can be complicated but you don't need to understand all the details in order to build a model like this. Rather than going through the whole process, I'll just list the steps involved:
    • Create a new project and give it a name.
    • Click the Data library button and search for the “Defects in metal casting” dataset.
    • If you agree with the dataset license, click “Accept” and import the data.
    • Next, you need to pre-process the data, which is split into 80% training data, 10% evaluation data (used to test the model on unlabeled data at the end of eachepoch” or training cycle to see how well the training is progressing), and 10% of the data which is saved for any further testing that may be needed.
    • Click the wrench icon to display theFeature Settings” and make sure “Encoding” is set to “binary” (since the model only has two outcomes - “true”, the part is defective and “false”, the part isn't defective). Also make sure “Positive class” is set to “true”.
    • Click “Save version”, then click “Use in new experiment”.
    • Note: The pre-processing is complete – the next step is to build the model.
    • Click Input(s)/Target” in the Experiment Wizard and make sure the Input feature is set to “Image” and the target is set to “Defective”.
    • Click the Snippet” tab and select “EfficientNet B0”.
    • Click the Weights” tab. The EfficientNet snippet can be trained with pre-trained weights (which allows you to make use of knowledge gained from another dataset). Using pre-trained weights saves time and improves efficiency.
    • Click “Create” to move to the Modeling View”.
    • Click on the “Input” block, select “Image augmentation” and click “Natural images”. Image augmentation adds more variation to the images – it isn't necessary, but it may help to increase the model's accuracy.
    • Click “Run” to start the experiment running.
    • Once the experiment has run to completion, click Evaluation” at the top of the screen to view the results.
    • There are a number of “loss metrics” in the Evaluation view, but the primary ones for this experiment are “binary accuracy” (the percentage of correct predictions) and “recall” (the percentage of actual defective parts that were classified as defective by the model).
    • To inspect the model's predictions, select the subset and epoch (training cycle) you want to look at and click “Inspect”.
    • There are four possibilities for each prediction the model makes – a non-defective impeller is classified correctly as not defective (“false”), a non-defective impeller is classified incorrectly as “defective” (“true”), a defective impeller is classified correctly as defective (“true”), or a defective impeller is classified incorrectly as not defective (“false”).
    • Looking at theConfusion Matrix” will show the percentages of each outcome (true positive, true negative, false positive, and false negative). Those figures will tell you a lot about how well the model did, but the most important statistic is the number of false negatives (which results in sending out a defective part). Another important metric is the ROC (Receiver Operating Characteristic) curve, which plots true positive rates versus false positive rates.

Once the model has been trained, the final step is to deploy it and see how it performs on new data that it hasn't seen before. Here's how to deploy the model:

    • Download and unzip the test data (the portion of the data that wasn't used to train the model).
    • Go to theDeployment view” and click “New deployment”.
    • When the “Create deployment” screen displays, select the experiment you want to deploy and choose the epoch (training cycle) that had the best results to be your checkpoint.
    • Click the “Enable” button to deploy the experiment.
    • Click the “Test deployment” button to try the model out on the test data you downloaded.

If there's a problem with the results of the deployment test, you can review the different reports from the training run and see if you want to make changes in the project setup and rerun the experiment.

That's a quick look at how no-code AI platforms work. Since this is one of the fastest growing parts of the no-code landscape I plan on doing several more posts on this topic in the near future. In the meantime, there are many other platforms like the ones mentioned above - if you're interested in machine learning, by all means pick one and try building a few models yourself.